Tips on Using Handheld Infrared Thermometers
A handheld infrared thermometer is a useful diagnostic tool. Here are some tips on how to achieve accurate measurements, and how the handheld thermometer can be used to find out if a planned installation of fixed-mount sensors could be successful.
The thermometer measures an area, not just a dot
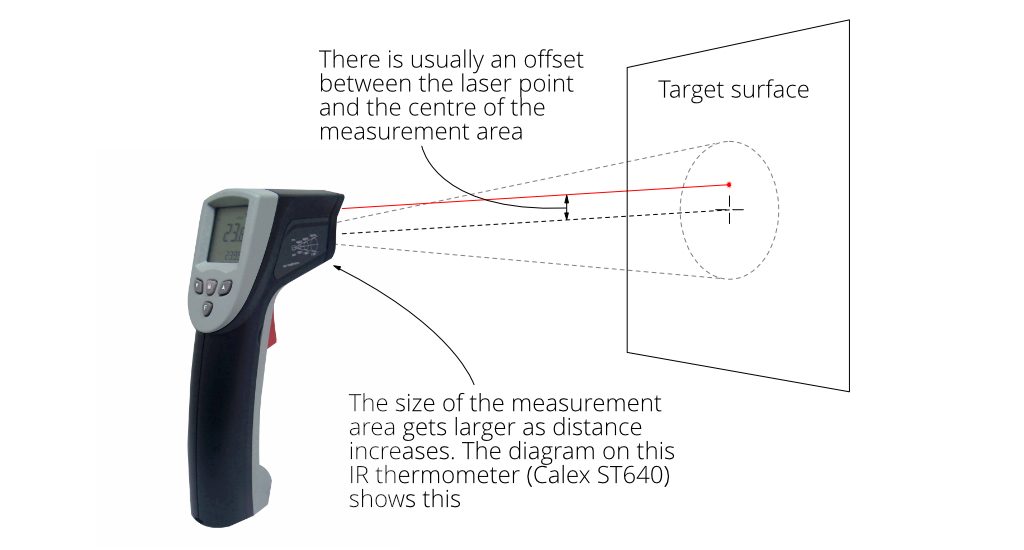
Most infrared thermometers have a laser point that shows where they are being aimed. The measured area is usually larger than the laser spot suggests. The optical diagram is usually printed on a label on the thermometer, and can also be found in the instruction manual. It shows the sensor’ FOV: the size of the measurement area for any given measurement distance. At longer distances, the measurement area is bigger.
It’s good practice to ensure the IR thermometer’s measured spot size is smaller than the target object being measured. For our fixed-mount sensors, we normally recommend the target should be at least twice the size of the measured spot for maximum accuracy.
See if you can take good measurements
Are you considering installing a fixed-mount infrared temperature sensor, but are not sure if it will work?
A handheld IR thermometer is an easy, inexpensive way to check if your application is suitable for an infrared temperature sensor before you invest in any new equipment.
If your IR thermometer can measure low temperatures (down to 0°C or below), the chances are that it measures a range of infrared wavelengths of around 8 to 14 microns. That’s the same as our general-purpose fixed-mount infrared temperature sensors, like the PyroCouple, PyroMiniBus and PyroNFC.
If you can achieve accurate measurements with a handheld IR thermometer, then you can expect good results with a fixed-mount sensor, provided it measures the same wavelengths.
Don’t give up if your measurements are bad
If you can’t achieve accurate measurements with a handheld IR thermometer, that might not rule out using an infrared temperature sensor completely. There are usually ways to improve the measurement accuracy, either by choosing a more suitable type of sensor or by configuring it properly to suit the application.
For example, are you measuring a reflective metal surface? If so, we would normally recommend a short-wavelength sensor, operating at a different range of wavelengths to that of the handheld device you are using. Alternatively, if you could make the surface non-reflective, such as by painting it, then the accuracy of your measurements should improve, with both handheld and fixed-mount sensors.
Also, have you tried adjusting the emissivity setting? Some handheld IR thermometers (like the ST640) have a fixed emissivity setting of 0.95, which is suitable for measuring non-reflective non-metals and painted surfaces, and on some devices it is adjustable (like the ST688). If you find you need to adjust the emissivity setting on the handheld device to get an accurate measurement, make sure the fixed-mount sensor you choose also has adjustable emissivity.
Watch out for thermal shock
Infrared thermometers work best when they are kept at a stable temperature. If the thermometer is being rapidly heated or cooled, it can introduce an error in the measurement. For maximum accuracy, it’s best to keep the thermometer in the area where it’s being used, and if it is taken into an area where the ambient temperature is significantly hotter or colder, then ensure the sensor is allowed to acclimatise first before taking any measurements.
More than just an infrared thermometer
Some infrared thermometers, such as the ST642 and ST689, have a built-in socket where a thermocouple probe can be connected. The unit functions as a handy contact thermometer, and the thermocouple can be used to check the actual surface temperature and help ensure the emissivity setting is correct.
If you have any questions about choosing or using a Calex infrared temperature sensor, please don’t hesitate to get in touch with us.